With the addition of native AOT in .NET 7, it became possible to compile C# into native code that doesn’t need a virtual machine to run. Instead of a “runtime” to manage the execution of the program, all that’s needed is a “runtime library”, like in C++.
Ability to compile to fully native code allows doing fun experiments, like replacing the runtime library that comes with the .NET SDK with something that is stripped to the bare minimum to run a very small subset of C#. You can build tiny programs where you can oversee every little aspect of its execution. I’ve been experimenting with what’s possible with the shipping .NET SDK in the zerosharp repo. One of the demos in the zerosharp repo is a bare metal boot application to display Hello World.
While it is possible to hack the official .NET SDK into building a boot application like it’s done in zerosharp, it’s not particularly pleasant (see the number of hacks in the project file, and reimplementation of things like System.Object in the C# source file). I created the bflat project to make these kinds of experiments simpler.
Bflat is an ahead of time compiler for C# built from parts of the official .NET SDK. At its core is a fork of the dotnet/runtime repository with a couple opinionated changes. This is built into the bflat CLI that exposes a C# compiler that can target both IL and native code.
The bflat compiler allows you to choose one of three options when it comes to the runtime libraries – you can either use the full runtime library that comes with .NET, or bflat’s own minimal implementation called zerolib, or no standard library at all.
| DotNet | Zero | None | |
|---|---|---|---|
| Primitive types | ✓ | ✓ | ✗ |
| Rich standard library | ✓ | ✗ | ✗ |
| Marshalling-less p/invoke | ✓ | ✓ | ✓ |
| Full p/invoke | ✓ | ✗ | ✗ |
| Garbage collector | ✓ | ✗ | ✗ |
| Exception handling | ✓ | ✗ | ✗ |
| Building apps and libraries | ✓ | ✓ | ✓ |
| Target Linux, Windows, Android | ✓ | ✓ | ✓ |
| Target UEFI | ✗ | ✓ | ✓ |
| Starting app size | 600 kB | 4 kB | ~4 kB |
Everything that I’m going to describe below is also possible to achieve with the official .NET SDK. It’s just a lot more work (and hacks) to get there, because as expected, the .NET SDK was not designed for this.
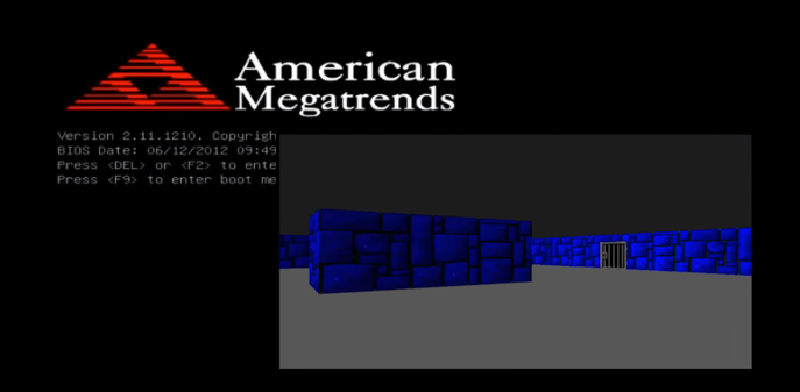
We’re going to build a small bootable maze “game” in C# that kind of looks like Wolfenstein 3D.
The boot process of modern computers
In modern times, the firmware of a computer can provide a lot more services than it used to in the 1980s BIOS-based systems. The boot process of most of today’s computers follows the UEFI standard. UEFI is an extensible standard that defines an interface for interaction of hardware with the operating system and its boot loader.
The UEFI firmware knows how to access storage devices, read files from their file system, or load executables from it. In a way, the firmware looks like a very simple operating system. The bflat compiler can target it by specifying the --os:uefi argument to bflat build. A simple hello world looks exactly the way you’d expect it.
System.Console.WriteLine("Hello World");
Build with:
$ bflat build --stdlib:zero --os:uefi --arch:x64 -o:bootx64.efi hello.cs
The generated bootx64.efi file can now be placed on a FAT32-formatted USB flash drive (must be placed under efi/boot directory) and a UEFI-compatible computer should be able to boot from it. If the computer is configured to boot from the USB device, the UEFI boot environment will look for a file named efi/boot/bootx64.efi (or efi/boot/bootaa64.efi for ARM64) and execute it.
Bflat’s zerolib contains an implementation of System.Console that uses UEFI APIs to talk to the firmware. We’ll talk about those later. If you look at the samples that come with bflat, you’ll find a small snake game that uses Console APIs for I/O. The game is written in a platform agnostic way and can be built for any of the OSes supported by bflat with either the standard runtime library, or zerolib. The runtime library papers over any platform differences.
Doing graphics in UEFI
Doing graphics is harder. The bflat project doesn’t want to be in the business of adding extensions to APIs in .NET that are not built into it in the first place. Any bflat project should also be a valid .NET project (although the set of supported platforms, or characteristics like size might be different). I often wish .NET had a built-in crossplat API to push pixels to the screen and samples to the speakers like libSDL. Unfortunately, there isn’t one, so it follows that bflat doesn’t have one either.
But since C# makes it easy to interoperate with unmanaged code through p/invoke (platform invoke), we can easily make one. On most platforms, interoperating with external APIs is done though dynamic loading. The executable file specifies the name of the API (optionally also name of the dynamic library implementing the API) and the operating system loader fixes things up at startup so that the API is callable when the program starts executing. The p/invoke mechanism used is called DllImport.
On UEFI, most communication is done through interfaces. At program start, the program entrypoint receives a pointer to the “EFI system table” from the UEFI firmware. This table contains a set of function pointers to access various services. This matches what .NET exposes under a different p/invoke mechanism - this one is called unmanaged function pointers.
[StructLayout(LayoutKind.Sequential)]
unsafe readonly struct EFI_SYSTEM_TABLE
{
    public readonly EFI_TABLE_HEADER Hdr;
    public readonly char* FirmwareVendor;
    public readonly uint FirmwareRevision;
    public readonly EFI_HANDLE ConsoleInHandle;
    public readonly EFI_SIMPLE_TEXT_INPUT_PROTOCOL* ConIn;
    public readonly EFI_HANDLE ConsoleOutHandle;
    public readonly EFI_SIMPLE_TEXT_OUTPUT_PROTOCOL* ConOut;
    public readonly EFI_HANDLE StandardErrorHandle;
    public readonly EFI_SIMPLE_TEXT_OUTPUT_PROTOCOL* StdErr;
    public readonly EFI_RUNTIME_SERVICES* RuntimeServices;
    public readonly EFI_BOOT_SERVICES* BootServices;
}

[StructLayout(LayoutKind.Sequential)]
unsafe readonly struct EFI_SIMPLE_TEXT_OUTPUT_PROTOCOL
{
    private readonly IntPtr _pad0; // Exact method/signature omitted for brevity

    // Function pointer to a function that takes a void* and char* and returns void*
    public readonly delegate* unmanaged<void*, char*, void*> OutputString;

    // Rest of the structure omitted for brevity
}
For example, to output a text string given a system table in variable mySystemTable, we’d do mySystemTable->ConOut->OutputString(EfiSystemTable->ConOut, stringOfChars);.
The zerolib in bflat abstracts all of this behind the standard APIs it implements, like Console.WriteLine. Unfortunately this also means that we don’t have access to this from user code – the C# Main starts with a method that takes an array of string (command line arguments), not a pointer to the system table.
Peeking into zerolib implementation, we can see that zerolib internally stores this in the object. s_efiSystemTable field. With .NET 8, it’s pretty easy to get access to this using unsafe accessors.
var mySystemTable = (EFI_SYSTEM_TABLE*)GetEfiSystemTable(null);

[UnsafeAccessor(UnsafeAccessorKind.StaticField, Name = "s_efiSystemTable")]
static extern ref void* GetEfiSystemTable(object e);
Now that we have a system table, let’s have a look at what UEFI provides. The spec at the official website is quite readable and translating the data structures to C# is not very complicated.
One of the members of the system table is a pointer to BootServices - another small structure with a bunch of function pointers. The interesting function on it is LocateProtocol which lets us look up more data structures with a bunch of other function pointers. One of the protocols is a protocol for graphics output.
EFI_GRAPHICS_OUTPUT_PROTOCOL* gop;
var status = efiSys->BootServices->LocateProtocol(EFI_GRAPHICS_OUTPUT_PROTOCOL_GUID, null, (void**)&gop);
if (status != 0)
    Fail("LocateProtocol", status);
This protocol contains function to enumerate supported display modes. We find one that is just big enough for what we need:
EFI_GRAPHICS_OUTPUT_MODE_INFORMATION *info;
nuint SizeOfInfo, nativeMode;
status = gop->QueryMode(gop, gop->Mode == null ? 0 : gop->Mode->Mode, &SizeOfInfo, &info);
if (status != 0)
    status = gop->SetMode(gop, 0);
if (status != 0)
    Fail("Query(Set)Mode", status);

uint bestMode = 0xFFFFFFFF;
uint bestHRes = 0, bestVRes = 0;
for (uint i = 0; i < gop->Mode->MaxMode; i++)
{
    status = gop->QueryMode(gop, i, &SizeOfInfo, &info);
    if (status != 0)
        Fail("QueryMode", status);

    if (info->HorizontalResolution >= 640 && info->VerticalResolution >= 480)
    {
        if (bestMode == 0xFFFFFFFF
            || (info->HorizontalResolution < bestHRes && info->VerticalResolution < bestVRes))
        {
            bestMode = i;
            bestHRes = info->HorizontalResolution;
            bestVRes = info->VerticalResolution;
        }
    }
}
if (bestMode == 0xFFFFFFFF)
    Fail("No usable display mode found", 0);
We then create a frame buffer (a byte array for 640 x 480 pixels, each pixel having RGB components and one byte of padding) and enter the main game loop where we check for input and render the game screen into the buffer. We then blit the buffer to screen with the Blt function provided by UEFI.
Zerolib fortunately provides APIs for checking for input. They’re not ideal (no key down/key up event) but that’s actually an UEFI limitation as well so we can’t do better even if we wanted.
byte[] fb = new byte[640 * 480 * 4];

System.Threading.Thread.Sleep(2000);

fixed (byte* pBuffer = fb)
{
    status = gop->SetMode(gop, bestMode);
    if (status != 0)
        Fail("Set", status);

    uint gameTime = 0;
    while (true)
    {
        keyState = default;
        if (Console.KeyAvailable)
            keyState = Console.ReadKey(false).Key switch
            {
                ConsoleKey.UpArrow => KeyState.Up,
                ConsoleKey.DownArrow => KeyState.Down,
                ConsoleKey.LeftArrow => KeyState.Left,
                ConsoleKey.RightArrow => KeyState.Right,
                _ => default,
            };

        RenderEffect(gameTime, pBuffer);
        status = gop->Blt(gop,
            (EFI_GRAPHICS_OUTPUT_BLT_PIXEL*)pBuffer,
            EFI_GRAPHICS_OUTPUT_BLT_OPERATION.EfiBltBufferToVideo,
            0,
            0,
            (bestHRes - 640) / 2,
            (bestVRes - 480) / 2,
            640,
            480,
            0);

        System.Threading.Thread.Sleep(10);
        gameTime += 10;

        if (status != 0)
            Fail("Blt", status);
    }
}
If you’re wondering about the maze drawing logic itself, I refer you to either:
I just took Lode’s C++ code and translated it into C#. There’s not much for me to talk about.
I hit a tiny snag that the System.Math class is not implemented in zerolib so I had dig into what I still remembered from university. This is my Sin/Cos (Taylor’s version). It’s good enough for what I need it for.
class Math
{
    public static double Sin(double x)
        => x - ((x*x*x)/(6)) + ((x*x*x*x*x)/(120)) - ((x*x*x*x*x*x*x)/(5040));

    public static double Cos(double x)
        => 1 - ((x*x)/(2)) + ((x*x*x*x)/(24)) - ((x*x*x*x*x*x)/(720)) + ((x*x*x*x*x*x*x*x)/(40320));
}
I’ve placed the whole thing on GitHub.
Here’s one more version of the game running on an old PC for a change: